You’ve set up Google Tag Manager to track clicks on your website. The numbers are coming in, but there’s something missing. You’re tracking only hints of behavior, but you’re missing the whole picture. To solve this, you need to put your click data into context.
In the article Google Tag Manager: The Basics, my colleague Stéphane Juricic introduced the Google Tag Manager to you. In this article I’ll talk about the data layer and illustrate the concept with some example implementations.
What is the data layer ?
The data layer is a way for making page data (for example product information, blog category or the visitor’s gender) available to Google Tag Manager. Technically the data layer is just a JavaScript object. The object contains all data you want to send to Google Tag Manager.
Using the data layer does not slow down page rendering and if you use multiple tracking tools in Google Tag Manager, you can use the same data from the data layer in all those tools without writing different code for each of the tools. This also means you can add or change tools easily without changing the source code of your webpages.
How to use the data layer ?
To add a data layer to your page, you don’t have to do anything. That’s right! The Google Tag Manager container adds one for you automatically. Only if you want to use the data layer before the Google Tag Manager container snippet on your web page, you first need to add this little line of JavaScript:
var dataLayer = [];
Setting a property in the data layer is easy too:
dataLayer.push({'color': 'red'});
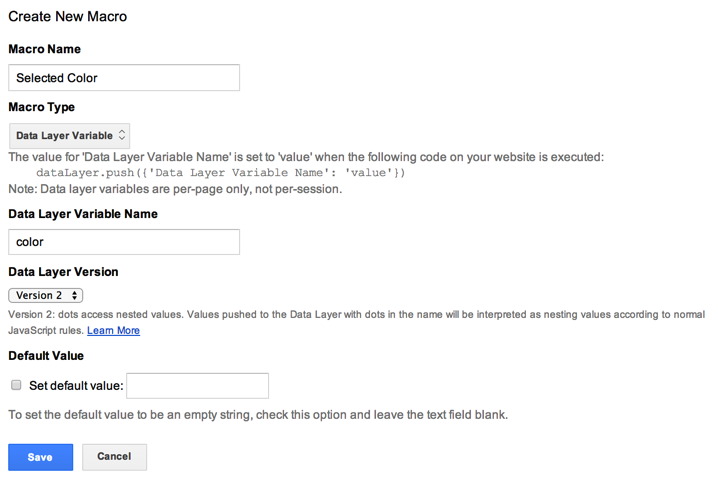
The code above sets the property color to red in the data layer. If you have previously set another value for color it will be overwritten with the new value red. Right now the property color will be available in Google Tag Manager. To use the property in Google Tag Manager, you need to create a new macro as displayed below:

If you wish, you can also set a default value for the value that will be used whenever there is no value set for the property in the data layer. You can also set multiple properties in one time by separating them by a comma:
dataLayer.push({
'pageCategory': 'signup',
'visitorType': 'high-value'
});
Responding to user actions
It’s also possible to trigger events with the data layer. If you want to track a certain user action for example, you can create a tag in Google Tag Manager that reacts to a specific event. Triggering an event is done with a special data layer property called event. Whenever you set the value of event, the event is triggered in Google Tag Manager:
dataLayer.push({
'color': 'red',
'conversionValue': 50,
'event': 'customizeCar'
});
The code above first sets the property color to red and property conversionValue to 50. After that the event customizeCar is triggered. The same technique above can be used to react to user actions, for example when a user clicks a certain link:
<a href="#" name="color" onclick="dataLayer.push({
'color': 'red',
'conversionValue': 50,
'event': 'customizeCar'});">Customize Color</a>
To respond to the event with Google Tag Manager, we first need to create a new tag. For track type Event:
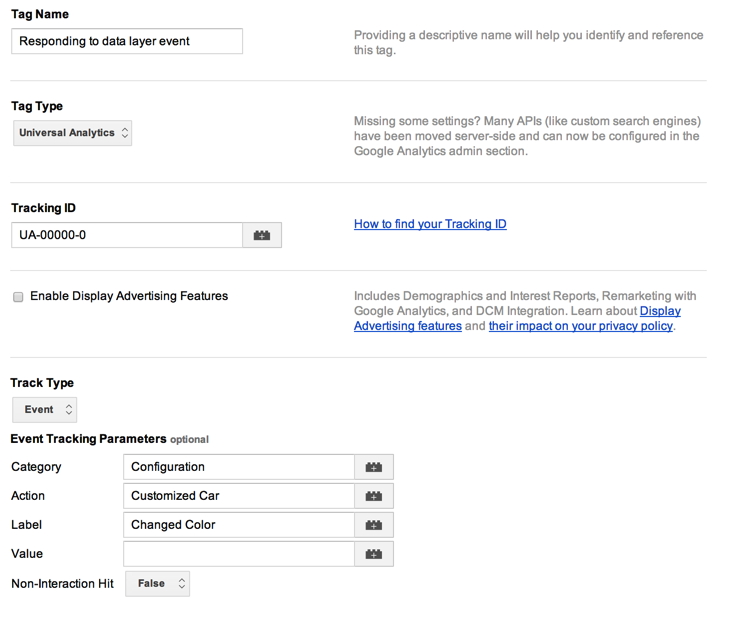
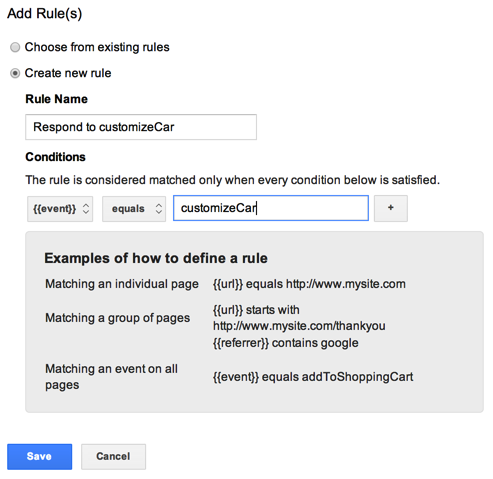
Then we need to create a firing rule that fires the tag whenever event equals cusomizeCar:
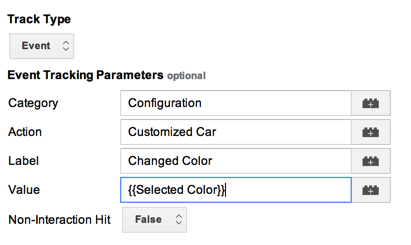
If you want, you can use properties of the data layer in the category, action, label and value field of the analytics event. For example if we want to know what color the user selected, we can add a macro that points to the color property of the data layer:
The resulting event tracking parameters now look like this:
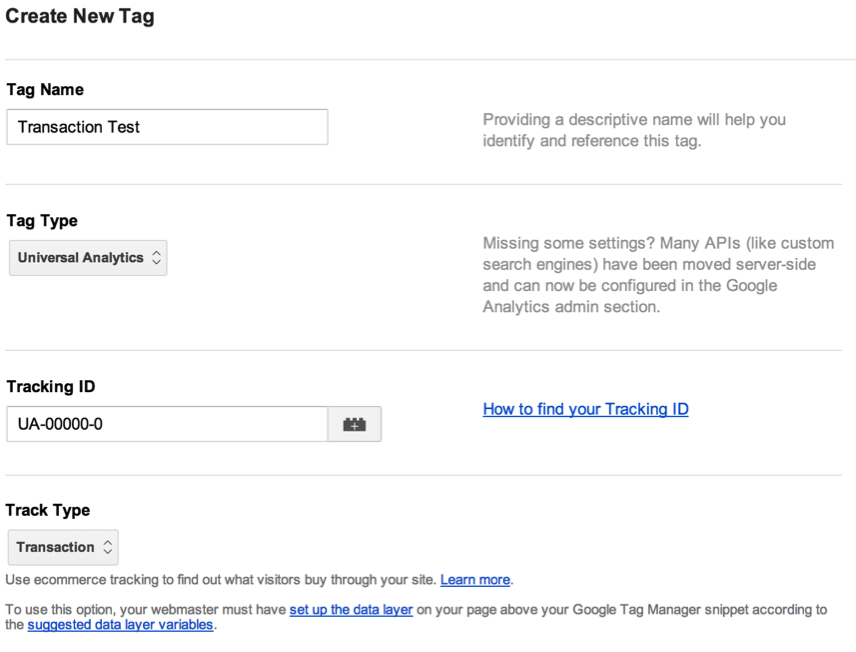
Tracking transactions
A last thing I wanted to show you today is tracking transactions with the data layer and Google Tag Manager. To do this, you need to set a couple of properties in the data layer to describe the transaction:
dataLayer.push({
'transactionId': '1234',
'transactionAffiliation': 'Acme Clothing',
'transactionTotal': 11.99,
'transactionTax': 1.29,
'transactionShipping': 5,
'transactionProducts': [{
'sku': 'DD44',
'name': 'T-Shirt',
'category': 'Apparel',
'price': 11.99,
'quantity': 1
}],
'event': 'myNewTransaction'
});
You can find more information on the required properties and what they mean on the link below:
https://support.google.com/tagmanager/answer/3002596?hl=en&ref_topic=3002579
In Google Tag Manager, you need to add a new tag in the same way as you were responding to another data layer event with the only difference that track type is now Transaction instead of Event:
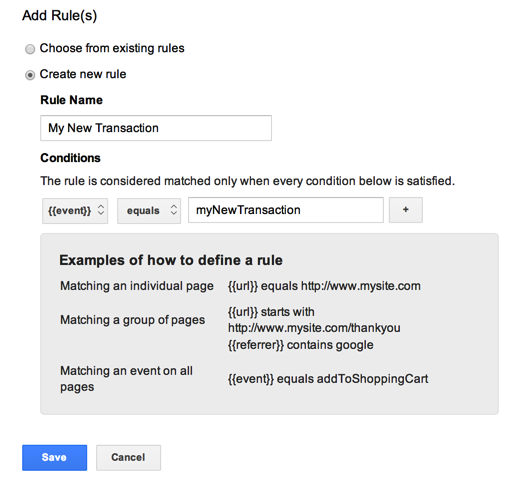
And in firing rules, you create a new rule for the event myNewTransaction:
You now know how to add context to your click data with the data layer and Google Tag Manager.
Happy analyzing!

David Peeters
| LinkedinThis email address is being protected from spambots. You need JavaScript enabled to view it.