
If you haven’t heard about GA4 before or you didn’t start the initial setup, I recommend you to start reading the excellent article ‘The new Google Analytics (GA4) - How to get started from an existing GA account’ written by my colleague Charlie. Note that this article won’t be an exhaustive deep dive into every known element of a complete Enhanced Ecommerce setup, but rather an introduction into the most important elements in order to get the basics right. This walkthrough is intended for GTM users but could be replicated to any Tag Management System of other vendors.
1. Different GA4 actions and their EEC counterparts
We will start by giving you a list of all GA4’s actions that we consider part of a basic set-up and compare them with their Enhanced Ecommerce equivalents.
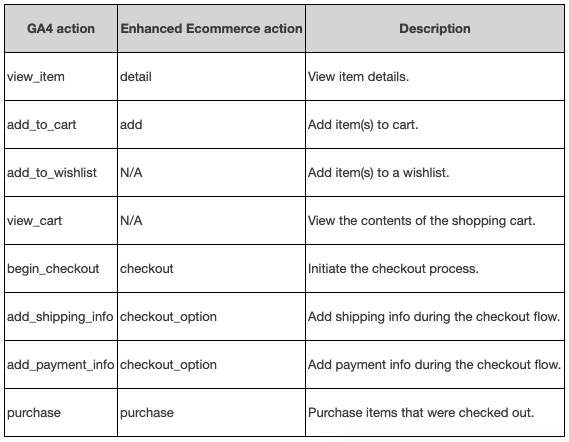
It’s important to notice that Google updated the event nomenclature so it is now using the action-object naming convention which is cleaner and will also make you reflect on your naming before starting to blindly implement custom events yourself. You need to make sure that the Event Name fields are always set to the corresponding conventions mentioned in the table when building the tags in GTM in order to send the Ecommerce data to GA4 properly.
2. Different GA4 parameters and their EEC counterparts
Just like before each of these Actions need to be pushed with a specific set of parameters in order to get the information displayed in the corresponding reports. The most important pieces of data are the products that are pushed alongside the action. Also here the syntax got an upgrade. You can find the most common product parameters in the list below:
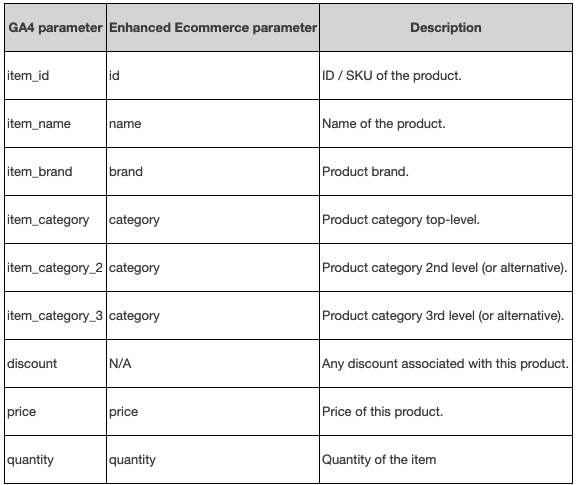
A major change (apart from the naming) is that the old ‘category’ element got split up into different levels of categories. This way you can today split out your product into 5 subcategories. Very helpful! Note as well that for the funnel checkout there are no steps anymore. As nowadays most checkouts have a similar structure, GA4 provides by default the most common steps such as viewing your cart, adding shipping info, and adding payment info.
Don’t panic! Before you start rewriting your dataLayer object like a lunatic, it’s important to know that GA4 does support your previous Enhanced Ecommerce model in a limited way.
Google helps you out by adopting the Product variable from your existing Enhanced Ecommerce object. That way you don’t just yet need to worry about creating the Items object in your dataLayer, as GA4 will be able to automatically map the parameter names in the Enhanced Ecommerce Products object to their corresponding parameters in GA4.
Note as well that either item_id or item_name are required. But as always, the more information you provide, the more detailed your reporting will be.
The cool thing thing is that in GA4 you can actually add every parameter you want (just add them to your items array and they will be captured). I’m talking about things that are custom to your set of products (size, color, you name it). The downside is that today these won’t appear yet in your Enhanced Ecommerce reporting, but we estimate this will only be a matter of time given that the new data model is perfectly equipped to do that.
3. The implementation in GTM
Enough theory, let’s have a look at the GTM implementation for advertisers that are already having a dataLayer object fit for traditional Enhanced Ecommerce tracking.
I would strongly suggest you start setting up the actions below when kicking off with GA4 EEC:
- view_item
- add_to_cart
- begin_checkout
- add_shipping_info
- add_payment_info
- purchase
Unlike Enhance Ecommerce there is no built-in Ecommerce integration in GA4. This means that it’s more than just an automated button click in order to capture the necessary data from the dataLayer.
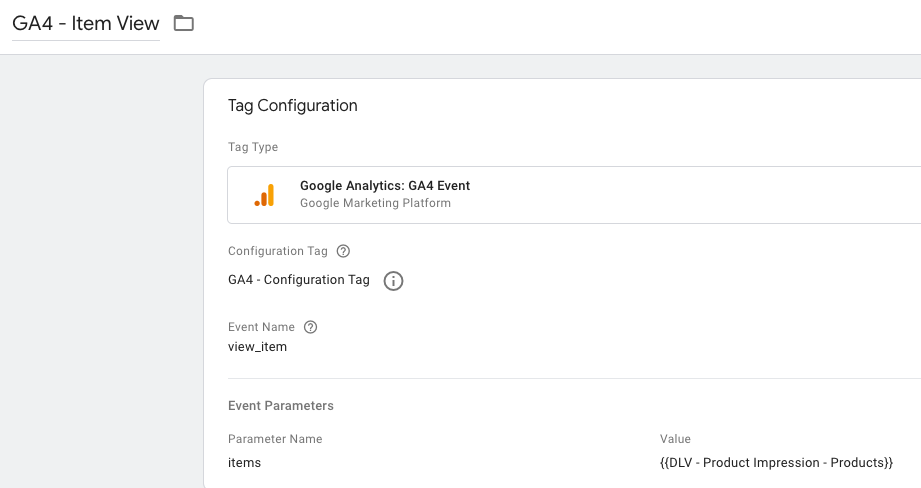
Step 1: view_item
To create an Ecommerce tag in Google Tag Manager, you need to create a new Google Analytics 4 Event tag. It’s important that you use the Event Name exactly like they are written in the table above, otherwise the report won’t populate. In this instance we name it ‘view_item’. This event only needs 1 parameter: the list of Item(s) that is being viewed. For that you should be able to use the dataLayer variable capturing your products array. If your dataLayer is standardized this value should be called ‘ecommerce.detail.products’.
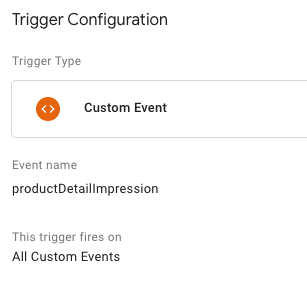
All what’s left to do now is fire the right trigger. Also here you can simply re-use your EEC triggers of GA. Preferably use a Custom Event trigger that fires when the Ecommerce object is pushed into the dataLayer. In our situation it looks like this:
Step 2: add_to_cart
Once you get the hang of it, you’ll see that it’s more or less the same for each step. The only things changing are the Event Names, parameters and triggers.
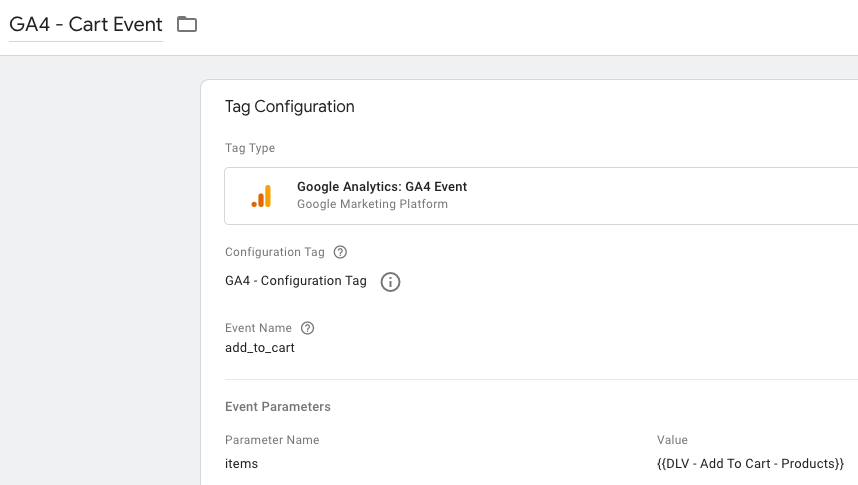
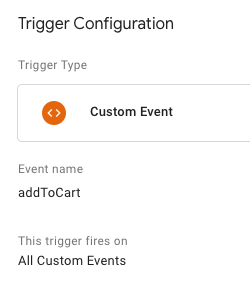
If your dataLayer is standardized, the value of your items parameter should be called ‘ecommerce.add.products’. The trigger is again a Custom Event which should already exist within your GTM setup:
Step 3: begin_checkout
For times sake I’m only including the screenshots for the begin_checkout setup as it’s similar for add_shipping_info and add_payment_info.
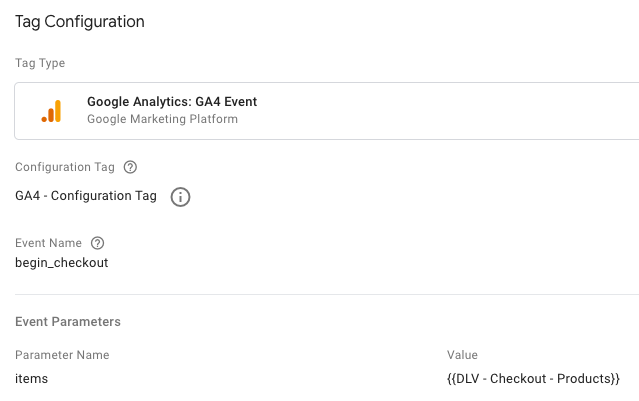
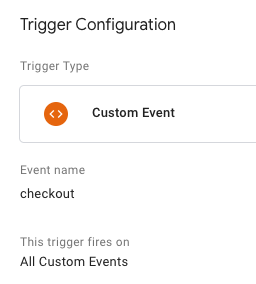
If your dataLayer is standardized, the value of your items parameter should be called ‘ecommerce.checkout.products’. The trigger is again a Custom Event which should already exist within your GTM setup:
Three important sidenotes:
1. Don’t forget to change the trigger for the add_shipping_info and add_payment_info event tags.
2. For add_shipping_info you need to add the required parameter ‘shipping_tier’. For this you can use the dataLayer variable ‘ecommerce.checkout.option’

3. For add_payment_info you need to add the required parameter ‘payment_type’. For this you can also use the dataLayer variable ‘ecommerce.checkout.option’, of course be aware that you need to launch the trigger on the right step within the checkout funnel.
Step 4: purchase
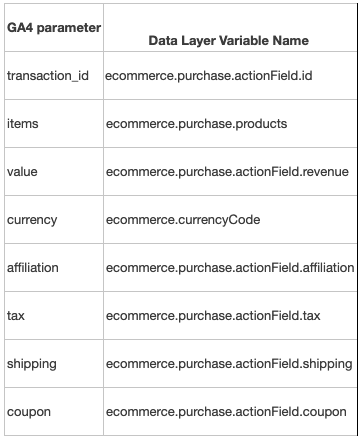
The purchase event has more required parameters but all of them should already be retrievable from your Enhanced Ecommerce dataLayer.
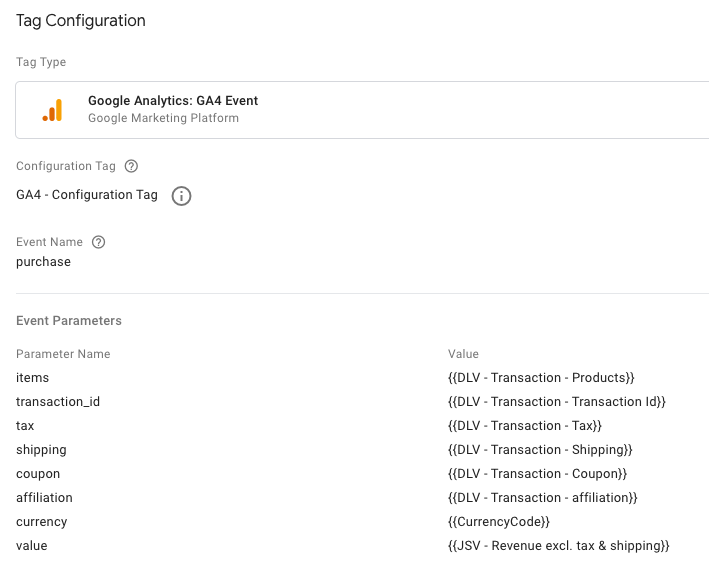
If your dataLayer is standardized, the values of your parameters can be found in the table below.
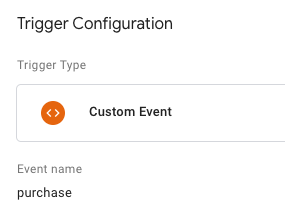
Finally, the trigger is again a Custom Event which should already exist within your GTM setup:
Congratulations, that summarises it for your initial implementation! For a more detailed guide, I suggest you to also read Simo Ahava’s walkthrough or the Teckers article if you're using Shopify. Stay tuned for our upcoming article focusing on more advanced event-tracking with an eye on migrating your dataLayer to the new GA4 standards.

Frédéric Palella
| LinkedinThis email address is being protected from spambots. You need JavaScript enabled to view it.
